


25 White and Gold Nails That’ll Make You Cancel Your Current Mani Appointment
October 16, 2025

Okay, I’ll admit it – I was that person rolling my eyes at the white and gold nail trend. It seemed too simple, too… safe? But then I tried it for my cousin’s wedding last spring, and suddenly I understood the hype. This color combo has become the most searched nail design on Pinterest, with over 2.3 million pins according to Stylezuri’s nail trend analysis, and honestly, I can see why.
Here’s the thing: these shades just work. You get sophistication without stuffiness, glamour without going overboard. Whether you’re prepping for wedding season, want something Instagram-worthy, or just need nails that work with literally everything in your closet, this pairing delivers every single time.
Not sure which white and gold shades flatter your skin tone best? Take our Free Color Analysis Quiz to find your perfect match.
Quick Resources:
-
Find your most flattering white and gold tones with our Free Color Analysis Quiz
-
Explore all our Wedding Tools to plan beauty, timing, and coordination with ease
I’ve rounded up 25 stunning designs that range from office-appropriate elegance to full-blown statement pieces. Each one comes with real talk about what works for different lifestyles and skill levels – because let’s be honest, not all of us have steady artist hands.

TL;DR
- This color combo works for every occasion, from daily wear to formal events
- Simple designs = basic skills, dimensional options = professional help needed
- Basic polish combinations cost under $20, complex 3D designs can hit $100+
- Flat finishes last 2+ weeks, raised embellishments work best for 3-7 days
- Cool undertones? Go platinum white with rose gold. Warm undertones? Try ivory with yellow gold.
Classic Elegance Designs
These five timeless looks are your safe bet for any situation. They’re sophisticated enough for the boardroom but still interesting enough to get compliments. Plus, most people can master these techniques with a little practice.
1. French Tips with Gold Accent
Take your basic French mani and make it special by adding thin gold striping tape along the tip line. Start with a clear base, apply white tips however you usually do them, then carefully place gold tape where the white meets your natural nail.
Real talk: this takes steady hands, but it’s totally doable. You’ll need quality white polish, gold striping tape, and a good top coat. Expect about two weeks of wear with proper care.

2. White Base with Gold Foil Details
Want to look expensive without the price tag? Press gold foil onto strategic areas of white nails. Apply your white base, add foil adhesive (don’t use regular top coat – trust me on this), then gently press gold foil sheets where you want them.
The beauty of this technique is that the randomness makes each nail unique. You literally can’t mess it up because there’s no “right” way to do it.
My friend Sarah tried this for her company party – she was nervous about doing it herself but it actually turned out gorgeous. The trick? Don’t overthink the placement. The organic patterns ended up looking way more artistic than anything she could have planned.
Before you start your next nail design, use our Free Color Analysis Quiz to pick tones that complement your complexion.
3. Alternating White and Gold Nails
Sometimes the most striking designs are the simplest ones. Paint alternating nails in solid white and solid gold. That’s it. This pattern works especially well on shorter nails where intricate details might get lost.
The key is achieving perfect opacity – streaky application will ruin the clean effect you’re going for. Invest in high-quality polishes that give you full coverage in two coats.
4. White Nails with Gold Cuticle Line
Add subtle glamour by painting a thin gold line along the cuticle area. This minimalist approach creates visual interest without overwhelming detail, making it perfect for conservative workplaces.
Pro tip: Practice the motion on paper first. You want one smooth stroke rather than multiple choppy attempts that create uneven lines.
5. Pearl White with Gold Dust
Combine iridescent pearl white polish with fine gold dust for subtle shimmer that catches light beautifully. Apply the pearl white base, then dust gold powder over the tacky top coat before sealing everything.
This design photographs beautifully in natural light and works for both daytime and evening events. Plus, the pearl base adds depth while gold dust creates movement.

Glamorous Statement Pieces
Ready to turn heads? These five designs are for when you want nails that start conversations. They require more skill and maintenance, but the Instagram-worthy results are totally worth it.
6. White and Gold Marble Effect
Create sophisticated stone-inspired patterns by manipulating wet polish with toothpicks or small brushes. I’ll be real with you – this took me three tries to nail (pun intended), but when I finally got it right, I felt like a nail art genius.
The key is working quickly while the polish is still wet and moveable. Practice on a palette first to get comfortable with the pressure and movement needed.
7. White Base with Gold Glitter Gradient
Start with solid white nails, then create an ombre effect by concentrating gold glitter at the tips and gradually decreasing density toward the cuticles. This creates beautiful light-catching movement that’s perfect for celebrations.
Layer the glitter gradually rather than trying to achieve the gradient in one go. Build up the concentration slowly – patience is key here.
8. 3D Gold Embellishments on White
Transform simple white nails into luxury statements with raised elements like studs, pearls, or small charms. The trick is strategic placement – too many elements create chaos, while thoughtful placement creates elegant focal points.
Use nail glue specifically designed for embellishments, and press each element firmly for several seconds. Apply thick top coat around (not over) raised elements to help secure them.

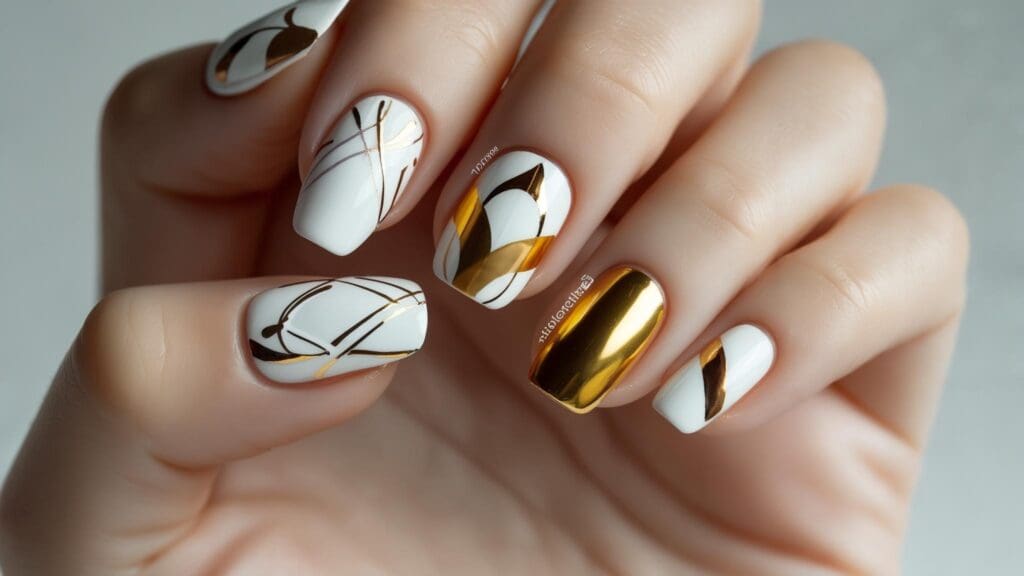
9. White and Gold Geometric Patterns
Create bold modern looks using white as the base with gold forming triangles, hexagons, or other contemporary shapes. Striping tape is your best friend here for clean lines.
Plan your design on paper first, especially for complex patterns that span multiple nails. Remove tape while polish is slightly wet to prevent peeling.
10. Gold Chrome with White Accents
Start with high-shine gold chrome finish, then add strategic white details for contemporary appeal. Chrome powder creates that mirror finish that’s incredibly eye-catching.
Fair warning: chrome application requires special base coats and techniques. My friend Jessica attempted this at home after watching YouTube tutorials and ended up with patchy, dull areas. After two failed attempts, she visited a professional who nailed the perfect mirror finish in 45 minutes.
Planning a metallic or chrome look? Discover which gold tones suit your undertones best using our Free Color Analysis Quiz — it’s quick and free.
Bridal and Special Occasion Nails
These five romantic designs are perfect for weddings, engagements, and formal celebrations. Each option balances elegance with photogenic appeal, ensuring your nails complement rather than compete with your special day look.
Planning your dream wedding involves countless details, and bridal shower planning requires careful coordination to ensure every element is perfect.
11. White Lace Pattern with Gold Highlights
Create intricate lace-inspired designs using white as the base with gold accents highlighting key elements. This romantic option works beautifully for weddings where delicate femininity is desired.
Hand-painting lace requires serious skill and patience. Consider using lace stamping plates for more consistent results, then adding gold highlights with a small brush for custom touches.
My friend Emma went with this for her wedding, and here’s what she learned: always do a trial run. She booked hers three weeks out and worked with her nail technician to perfect the design. The delicate lace motifs complemented her vintage dress beautifully, and the gold highlights caught the light perfectly in photos.
Brides love using our Free Color Analysis Quiz to find gold and white shades that photograph beautifully on their big day.
12. White Base with Gold Wedding Ring Design
Celebrate engagements and weddings with romantic ring motifs or infinity symbols painted in gold over white bases. These symbolic designs create meaningful nail art that tells your love story.
Keep it simple – ring outlines work better than complex designs that might look cluttered on smaller nail surfaces.
13. White and Gold Floral Motifs
Paint delicate flowers in white with gold centers, leaves, or outlining for garden party elegance. These romantic designs work beautifully for spring and summer weddings.
Start with simple five-petaled blooms – they’re easier than complex roses. Add gold details last, using them to define centers or create delicate leaf veining.

14. White Pearl and Gold Bead Combination
Combine pearl effects with actual gold beading or small gold pearls for ultimate bridal glamour. This luxurious design creates texture and dimension while maintaining romantic elegance.
Apply beads over tacky base coat, pressing firmly to secure. Use tweezers for precise placement, and work on one nail at a time.
15. White and Gold Damask Pattern
Create ornate vintage-inspired elegance with damask designs in gold over white bases. These formal patterns work beautifully for traditional weddings.
Honestly? This works best with stamping plates for consistency. Hand-painting requires significant skill. Focus on one or two accent nails rather than attempting the pattern on all ten fingers.
When planning your special day, consider how wedding speech coaching can help ensure every moment flows perfectly.
Modern and Trendy Options
These five contemporary designs reflect current nail art trends for fashion-forward individuals. Each offers fresh takes on this classic color combination that feel current and Instagram-ready.
16. White Negative Space with Gold Lines
Strategic white spaces combined with gold linear patterns create contemporary appeal. This modern approach feels fresh while maintaining the sophisticated color palette.
Plan negative space areas carefully – they should feel intentional rather than accidental. Use striping tape for clean edges, removing it while polish is slightly tacky.
17. White and Gold Abstract Art
Express creativity with artistic brushstrokes, splatters, or modern art-inspired patterns. This category allows for personal expression while maintaining the elegant color scheme.
Abstract designs work best when you embrace imperfection. Use various brush sizes and techniques like sponging or dragging to create interesting textures.

18. White Base with Gold Holographic Accents
Combine matte white bases with holographic gold elements that shift color in different lighting. This futuristic design creates dynamic visual interest that changes throughout the day.
Holographic elements work best as accents rather than full coverage. The contrast between matte white and shifting holographic gold creates stunning visual tension.
19. White and Gold Minimalist Lines
Clean, modern designs featuring simple gold lines, dots, or basic geometric shapes on white backgrounds appeal to those who prefer subtle sophistication.
Minimalist designs require precision – every line and dot should be intentional and perfectly placed. Quality striping brushes are essential for the cleanest results.
20. White Matte with Gold Metallic Details
Contrast matte white finish with high-shine metallic gold accents for contemporary texture play. The interplay between finishes creates visual interest without complex patterns.
Apply matte top coat carefully to avoid streaking, and add metallic details after the matte finish is completely dry. The contrast only works when both finishes are perfectly applied.
Modern brides often explore 2025 wedding trends to ensure their special day reflects contemporary style sensibilities.
Textured and Dimensional Creations
These five advanced designs incorporate tactile elements and raised surfaces for luxury appeal. Each requires specialized materials and techniques, making them ideal for special occasions where maximum impact is desired.
21. White and Gold Caviar Beads
Create textured surfaces using white bases with gold caviar beads for raised, tactile luxury. These tiny beads catch light beautifully and create interesting visual and physical texture.
Apply beads over tacky base coat, pressing gently without crushing them. Work quickly – the window for bead adhesion is limited.
22. White Base with Gold Chain Details
Incorporate actual miniature chains or chain-print patterns for dimensional interest. This edgy design adds unexpected texture while maintaining the elegant color scheme.
Real chains require nail glue for secure attachment. Plan placement carefully as chains can catch on clothing or hair. Consider chain-print alternatives for daily wear.
23. White and Gold Velvet Texture
Apply specialized velvet powder over white base with gold metallic elements for unique tactile luxury. This unusual finish creates sophisticated texture that’s completely different from traditional polish.
The texture won’t accept traditional top coat, so durability is limited compared to regular polish finishes.

24. White and Gold Quilted Pattern
Create padded, dimensional appearance using white base with gold lines forming quilted patterns. This sophisticated design mimics luxury handbag textures on your nails.
Use striping tape or thin brushes to create quilted grid patterns. Add subtle dimension with gel or thick polish in grid intersections.
25. White Base with Gold Raised Dots
Playful yet elegant designs featuring white backgrounds with raised gold dots in various sizes and patterns add dimension without overwhelming complexity.
Use dotting tools or 3D gel to create raised elements. Vary dot sizes for visual interest, and consider clustering patterns rather than uniform spacing.
Choosing the Perfect Design for Your Needs
Selecting the ideal design requires honest consideration of your lifestyle, skill level, and preferences. Here’s how to match designs to your specific situation.
Your lifestyle plays a huge role in design selection. If you’re constantly using your hands or work in healthcare, gravitate toward flat finishes without raised elements. Designs 1-5 and 19-20 offer durability for hands-on lifestyles while maintaining elegance.
Professional environments typically call for subtle sophistication. Classic elegance options work beautifully in conservative workplaces, while dimensional designs might be too distracting for client-facing roles.
Consider your maintenance preferences honestly. Some people love frequent salon visits and elaborate upkeep, while others prefer low-maintenance options. Simple polish combinations require minimal touch-ups, while 3D embellishments need careful handling.
What You Need to Know: Skills, Costs & Maintenance
Let’s break down the practical stuff so you know what you’re getting into:
Beginner-Friendly (Designs 1, 3, 4, 19)
– Skill level: Basic polish application
– Cost: $15-30 DIY, $30-50 salon
– Longevity: 10-14 days
– Maintenance: Low – just standard touch-ups
Intermediate (Designs 2, 6, 8, 16)
– Skill level: Some practice needed, doable at home
– Cost: $40-60 DIY, $50-80 salon
– Longevity: 7-10 days
– Maintenance: Medium – may need professional repair
Advanced (Designs 10, 11, 17, 21-25)
– Skill level: Professional recommended
– Cost: $60-100+ materials, $80-150+ salon
– Longevity: 3-10 days depending on design
– Maintenance: High – careful handling required
Pro Tips for Longevity:
– Flat designs without raised elements last longest
– Quality base and top coats make a huge difference
– Frequent hand washing and cleaning products reduce wear time
– Consider cost-per-wear: a $100 design lasting one week costs more per day than a $30 design lasting two weeks
Skin Tone Guide:
– Cool undertones: Platinum white with rose gold or champagne gold
– Warm undertones: Cream white or ivory with yellow gold or antique gold
– Neutral undertones: Lucky you – any combination works!

How Bridesmaid for Hire Can Perfect Your Wedding Day Nails
Planning a wedding involves hundreds of decisions, and coordinating nail designs across your entire bridal party shouldn’t add stress to your plate. Whether you’re envisioning classic French tips with gold accents for your engagement photos or elaborate marble designs for your wedding day, the coordination process can feel overwhelming when you’re juggling venue details, dress fittings, and family logistics.
Bridesmaid for Hire understands that every wedding detail matters, including ensuring your entire bridal party’s nails complement your overall aesthetic. Our professional bridesmaids have worked over 150 weddings and know exactly how to coordinate beauty appointments, manage timing logistics, and ensure everyone’s designs photograph beautifully together.
We can help you navigate the decision between glamorous statement nails or classic elegance designs, coordinate nail appointments for your entire bridal party, and ensure your maid of honor duties include supporting your beauty timeline seamlessly.
Whether you’re choosing between gold chrome with white accents or delicate lace patterns with gold highlights, we handle the behind-the-scenes coordination so you can focus on the fun parts of wedding planning. From helping you choose the perfect design to managing appointment scheduling, we’ve got you covered.
Coordinate every wedding detail seamlessly with our Wedding Tools — from nail looks to bridal timelines.
Ready to ensure your wedding day nails are absolutely perfect? Contact Bridesmaid for Hire today and we’ll handle the coordination details while you focus on choosing the design that’ll make your hands look stunning as you exchange rings.
Our comprehensive wedding day coordination services ensure every detail flows seamlessly, from nail appointments to ceremony timing.
Final Thoughts
This color pairing offers endless possibilities for expressing your personal style while maintaining timeless elegance. From simple polish combinations perfect for everyday wear to elaborate dimensional designs that steal the spotlight at special events, these shades deliver sophistication across every skill level and budget range.
The key to success lies in honest self-assessment of your lifestyle, maintenance preferences, and skill level. Don’t choose a high-maintenance design if you’re not prepared for the upkeep, and don’t settle for boring options when you’re craving something special.
Remember that nail art is temporary, making it the perfect playground for experimentation. Try that gold foil technique you’ve been admiring, or splurge on professional application for your next special event. This elegant combination creates a canvas for creativity and self-expression, so have fun with the process and don’t be afraid to try something new.
Whether you go classic or bold, simple or complex, you really can’t go wrong with this timeless pairing. It’s sophisticated enough for the boardroom, romantic enough for weddings, and versatile enough to work with literally everything in your closet. Now go cancel that boring mani appointment and try something that’ll make you want to take hand selfies all day long.
Complete your next manicure confidently — find your perfect white and gold shades now with our Free Color Analysis Quiz.
Related posts:


1-800-BRIDESMAID
The Newlywed
Card Game
something extra to love
Read the weekly newsletter from Bridesmaid for Hire, 1-800-Bridesmaid, to hear about real stories, from strangers, who need advice on love, life, friendship, and so much more.
Looking for the perfect wedding gift for someone you adore? Grab The Newlywed Card Game. It's a fun and interactive game they can play on their honeymoon or future date nights.

