


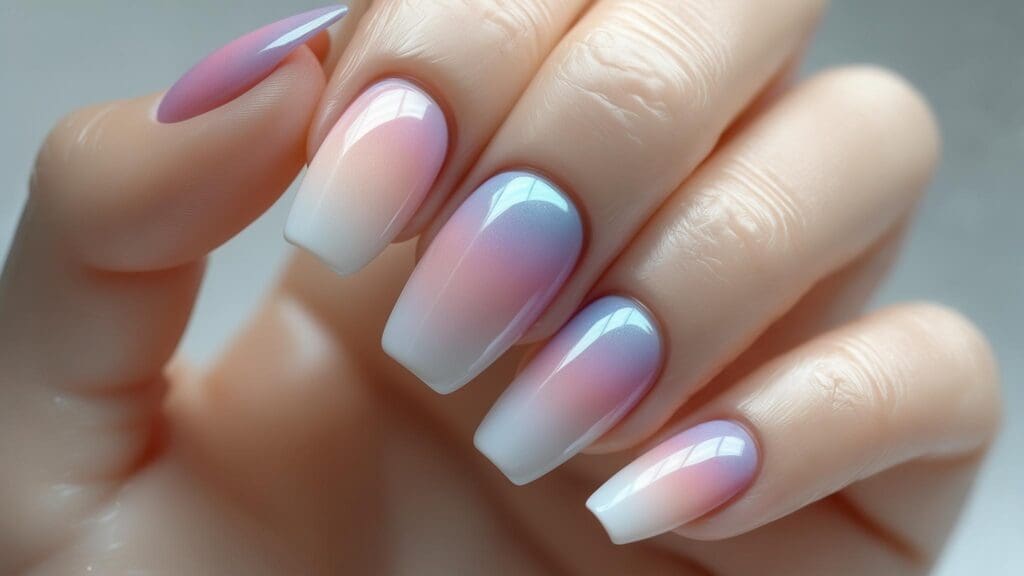

Ombre acrylic nails have become the holy grail of modern nail art, and honestly? I get it. There’s something magical about that smooth color transition that makes even the simplest manicure look professionally done.
I’ll never forget my first attempt at DIY ombre – what was supposed to be a dreamy pink-to-white gradient turned into what looked like a cotton candy explosion. Three attempts and two YouTube tutorials later, I finally got something that didn’t make me want to hide my hands in my pockets. That disaster taught me everything I wish someone had told me before I started: technique matters, but so does picking the right design for your skill level.
Quick Resources:
Coordinate your wedding ombre nails with our AI Wedding Planner
Find your best ombre shades with our Color Analysis Quiz
See all our wedding planning tools
What to Consider When Choosing Your Perfect Ombre Design
Let’s be honest – picking the right design isn’t just about what looks pretty on Pinterest. I’ve watched too many friends spend $100 on gorgeous chrome nails only to chip them the next day because they forgot they’re constantly typing.
Start with your skill level. Can you paint your regular nails without making a mess? Great, try a simple pink-to-white fade. Still painting outside the lines? Maybe hold off on that complex rainbow gradient for now.
Think about your lifestyle. If you’re washing dishes, typing all day, or chasing toddlers, those delicate white tips are going to look rough fast. Darker gradients hide chips like magic – trust me on this one.
Budget reality check: Simple DIY gradients cost about $20 in supplies. Professional chrome or 3D work? You’re looking at $100-150+. And remember, maintenance isn’t free.
Your workplace matters too. That electric blue-to-purple storm might look incredible, but if you work in a conservative office, save it for vacation.
Color compatibility with your skin tone can make or break any design. Warm undertones shine with coral-to-pink combinations, while cool undertones look stunning with blue-to-purple or silver-to-white gradients.
Find your best ombre shades with our Color Analysis Quiz
Real-Life Reality Check: My friend Sarah, a corporate lawyer, fell hard for electric blue-to-purple ombre after seeing it on TikTok. But after considering her conservative workplace and crazy schedule with zero time for touch-ups, she went with champagne-to-gold shimmer instead. Smart move – she got the glamorous look she wanted without the professional drama or maintenance nightmare.
Top 25 Ombre Acrylic Nail Designs
Instead of overwhelming you with fancy categories, here’s the real talk: I’ve organized these into three groups based on what actually matters – how hard they are and when you’d wear them.
Easy Wins (Perfect for Beginners)
These are your gateway designs. Mess up the blending? It still looks intentional.
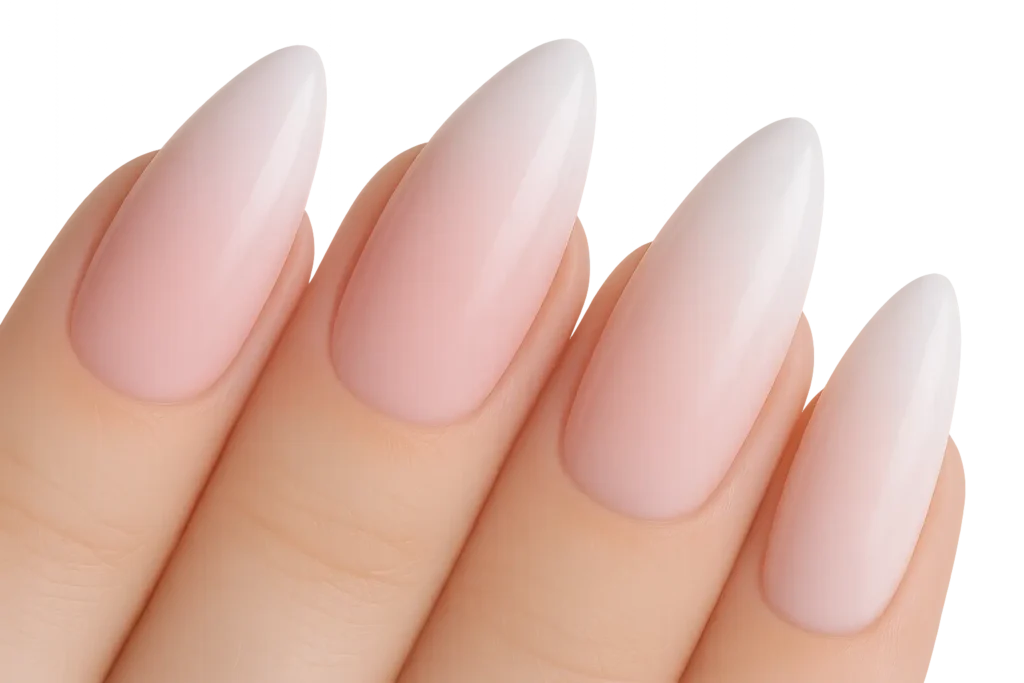
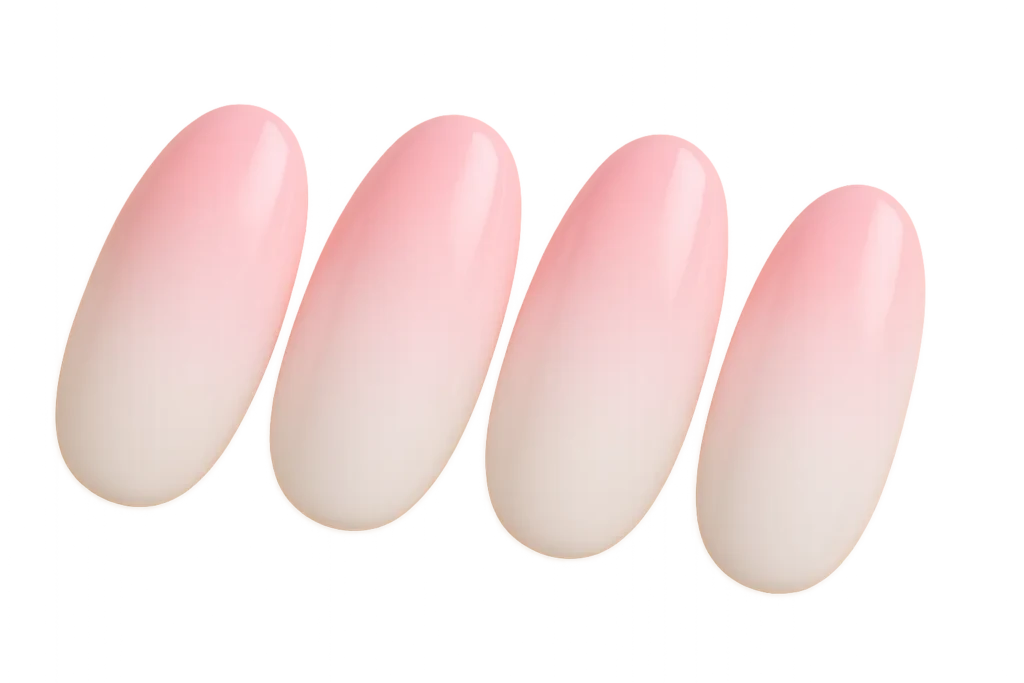
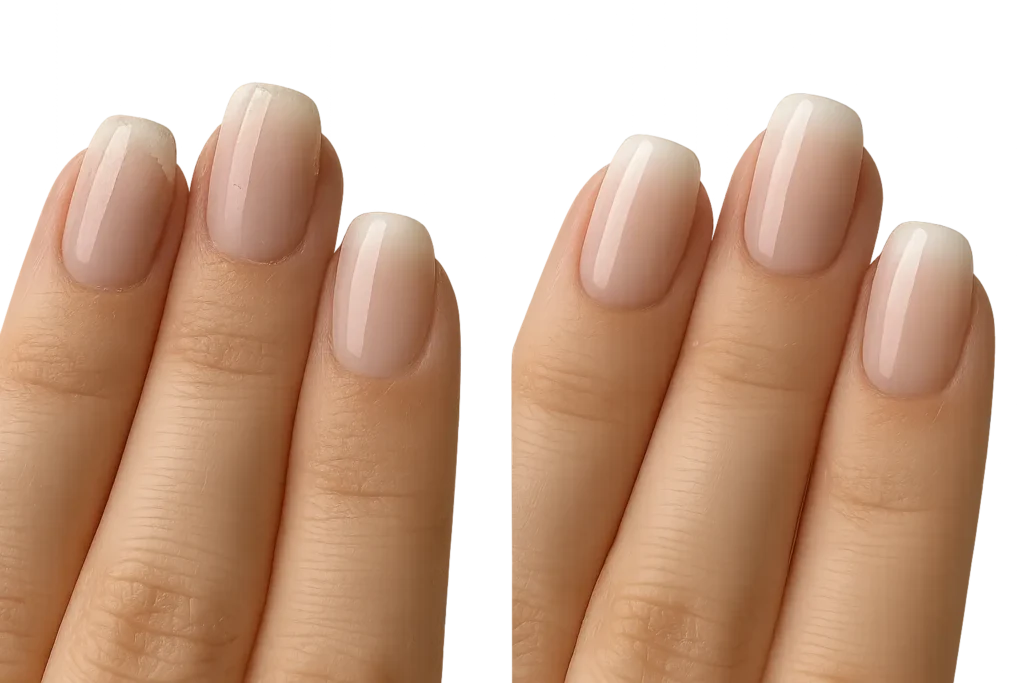
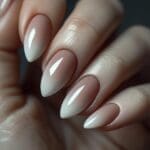
1. Pink-to-White Classic
The training wheels of ombre. Forgiving, pretty, and goes with everything. This was my first successful attempt after that streaky disaster I mentioned. The soft baby pink at the cuticle transitioning to crisp white tips creates the ultimate versatile design that flatters all skin tones.
2. Nude-to-Clear Stealth Mode
For when you want stronger nails but your boss thinks colored polish is “unprofessional.” It’s basically invisible but way more durable than your natural nails. This nearly invisible gradient enhances your natural nails while adding acrylic strength.
3. French Ombre Twist
Takes the harsh line of traditional French tips and makes it soft and modern. Way easier than you think. This contemporary take on the classic French manicure features soft pink base gradually transitioning to white tips with a beautifully blurred edge.
4. Soft Lavender-to-White
Dreamy and romantic without being too bold. Perfect for spring weddings or when you’re feeling feminine. The gentle purple-toned transition creates an ethereal, cloud-like effect that’s both calming and elegant.
5. Mint-to-White Fresh
Light, happy, and screams “I have my life together” even when you definitely don’t. This airy gradient embodies spring renewal and pairs perfectly with lighter wardrobes.
6. Champagne-to-Gold Shimmer
Subtle luxury that catches light beautifully. Great for when you want to feel fancy without going overboard. This sophisticated metallic gradient adds instant elegance to any outfit.
7. Coral-to-Peach Summer
Vacation vibes in nail form. Photographs amazingly against tanned skin. The warm peachy gradient captures summer sunshine perfectly and creates a healthy, sun-kissed appearance.
Statement Makers (When You Want Attention)
These require more skill but the payoff is worth it. You’ll get compliments.
8. Black-to-Silver Smoke
Edgy and dramatic. Fair warning: this shows every chip, so be prepared for touch-ups. The high-contrast gradient creates a smoky, sophisticated effect that’s impossible to ignore.
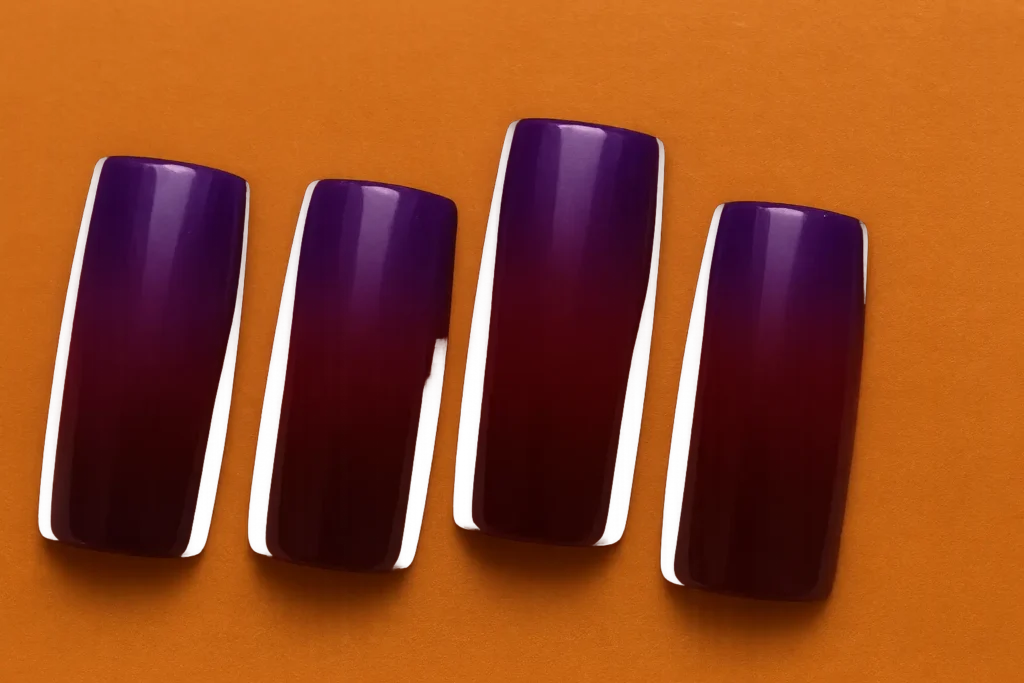
9. Deep Red-to-Black Vampire
Gothic elegance that’s perfect for fall. Makes you feel mysteriously glamorous. This intense gradient transitions from rich burgundy to midnight black, creating sophisticated mystery.
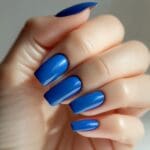
10. Electric Blue-to-Purple Storm
Bold choice that requires confidence to pull off. Not for the workplace unless you work somewhere cool. This vibrant gradient combines two cool-toned colors for a striking modern appearance.
11. Hot Pink-to-Orange Sunset
Tropical energy that instantly boosts your mood. Save for summer or when you need a pick-me-up. This warm-toned gradient mimics tropical sunset vibes perfectly.
12. Deep Purple-to-Burgundy Autumn
Rich and sophisticated. Pairs perfectly with cozy sweaters and wine. The jewel-toned gradient embodies autumn sophistication and coordinates beautifully with seasonal wardrobes.
13. Emerald-to-Black Forest
Elegant and mysterious. Great for formal events when you want something different from the usual neutrals. This rich green transitioning to deep black creates sophisticated drama.
14. Holographic Rainbow Shift
Changes color depending on the light. Conversation starter guaranteed, but also attention grabber. This multi-dimensional design shifts through rainbow colors with iridescent particles for maximum impact.

15. Ice Blue-to-Silver Winter
Holiday party perfection. Sparkles without actual glitter that gets everywhere. This cool-toned gradient captures winter’s crystalline beauty and works perfectly for formal winter events.
Show Stoppers (Advanced/Special Occasions)
These are investment pieces. Either practice a lot first or book a professional.
16. Chrome Silver-to-Rose Gold
Mirror finish that’s absolutely stunning but incredibly difficult to apply evenly. Worth the professional fee. This metallic gradient using chrome powders creates a mirror-like finish that photographs beautifully.
17. Glitter Fade Galaxy
Dense glitter gradually fading to clear creates a starry night effect. Removal is a nightmare, but it’s gorgeous while it lasts. Perfect for party seasons when you want maximum sparkle.
18. Matte Black-to-Glossy Clear
The texture change is more interesting than color. Surprisingly versatile once you get used to it. This unique finish transitions from matte to glossy rather than just color, creating modern sophistication.
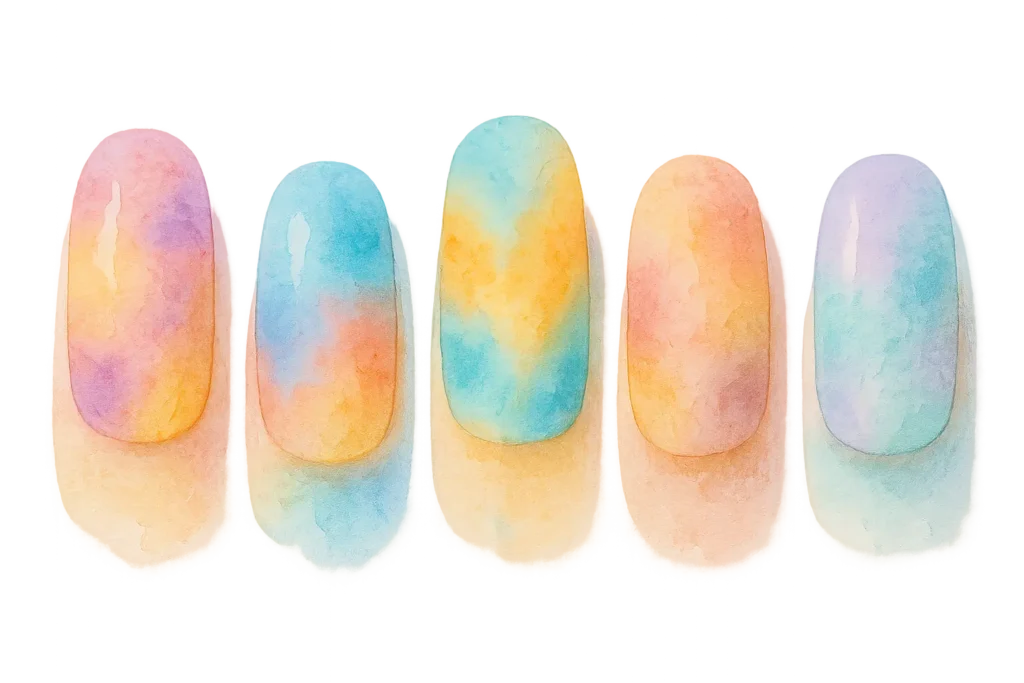
19. Watercolor Multi-Tone
Artistic and unique, but requires wet-on-wet technique that’s tricky to master. Each nail will look different. This technique blends multiple colors in organic, watercolor-painting style for one-of-a-kind artistic expression.
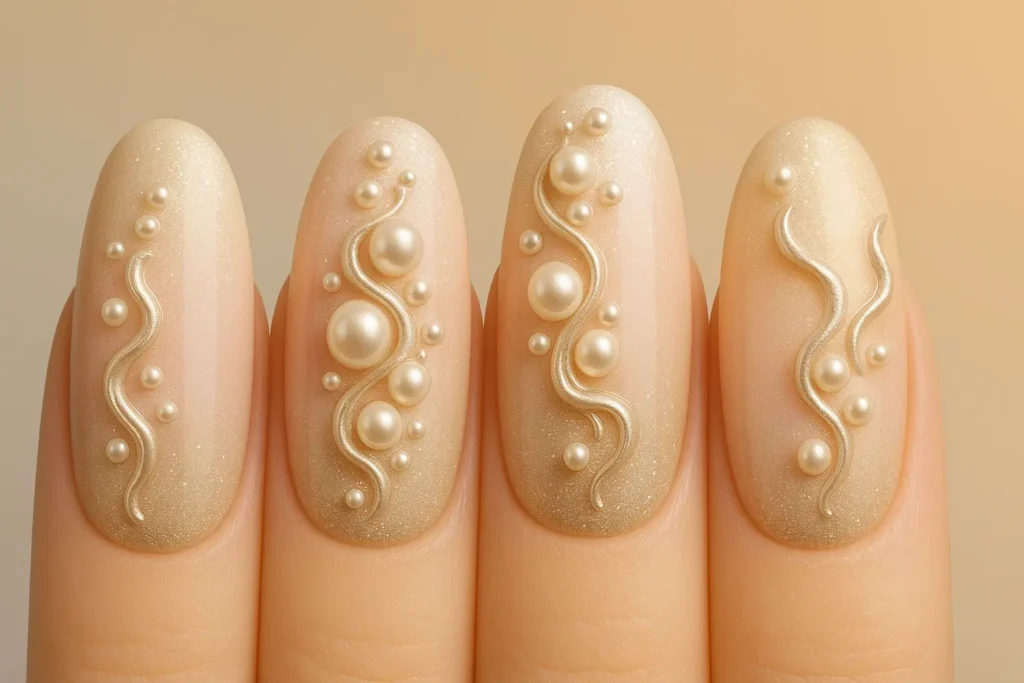
20. 3D Textured Gradient
Uses pearls, rhinestones, or raised elements. Ultimate luxury but high maintenance and expensive. This incorporates dimensional elements beyond just color transition for special occasions.
21. Color-Changing Thermal
Changes with temperature – cool party trick but the novelty wears off. Also limited color options. Uses temperature-sensitive polish that creates dynamic effects throughout the day.
22. Reverse French Ombre
Gradient goes the opposite direction. Looks modern and geometric but harder than regular ombre. The gradient starts at the tips and fades toward the cuticle for unique visual interest.
23. Diagonal Color Sweep
Color flows diagonally instead of vertically. Creates movement but requires steady hands. This runs diagonally across the nail rather than vertically for dynamic contemporary appeal.
24. Velvet Matte Burgundy-to-Pink
Textured matte finish feels luxurious but shows fingerprints easily. The velvet-like texture in deep burgundy transitioning to soft pink adds sophisticated luxury.
25. Dusty Rose-to-Mauve Vintage
Muted and romantic with vintage appeal. Perfect for romantic occasions. This muted gradient has timeless vintage charm that works for spring weddings or romantic events.
Real Talk: DIY vs Professional
Here’s what nobody tells you about success rates:
DIY Beginner Designs: About 75% chance of success if you’re patient and follow tutorials. Expect to redo at least once. Classic designs like pink-to-white generally require 2-3 coordinating colors plus proper blending technique.
DIY Advanced Designs: Maybe 30% success rate. Chrome powders are evil and will clump if you look at them wrong. These designs demand specialized materials and techniques that can be frustrating initially.
Professional Application: Nearly 100% success rate, but costs 3-5x more and requires appointments. Professional ombre typically ranges from $40-100+, with maintenance needed every 2-3 weeks.
My advice? Start simple, build skills gradually, and save the fancy stuff for special occasions when you can justify professional application.
Skill Level Progression Success Story: My friend Jessica started with simple nude-to-clear gradients, practicing the sponging technique until she achieved smooth transitions. After mastering basics over three months, she progressed to pink-to-white gradients, then seasonal designs. Now, after a year of practice, she confidently tackles chrome finishes and plans to attempt watercolor blends next. This gradual skill building prevented frustration and built genuine expertise.
Matching Your Lifestyle
Conservative workplace: Stick to nudes, soft pastels, and subtle shimmers. Save the electric blue for weekends. Nude-to-clear, champagne-to-gold, and soft lavender-to-white maintain appropriateness while adding subtle elegance.
Creative environment: Go wild. Holographic, watercolor, bold gradients – your workplace probably encourages self-expression. These environments welcome artistic statements and conversation starters.
Busy parent/professional: Darker gradients hide chips better. Avoid white tips unless you enjoy constant touch-ups. Matte finishes also cleverly disguise wear and tear.
Social butterfly: Chrome and glitter fade designs photograph beautifully for social media but require frequent maintenance every 1-2 weeks.
Seasonal Strategy
Instead of completely changing designs every month, think about seasonal rotations:
Spring: Fresh mints, soft lavenders, dusty roses – light colors that complement pastel wardrobes and optimistic energy
Summer: Corals, peaches, tropical brights that capture vacation vibes and photograph beautifully in natural lighting
Fall: Deep purples, burgundies, emeralds that coordinate with richer seasonal fashion palettes
Winter: Icy blues, silvers, champagne golds perfect for holiday celebrations and formal events
This keeps you current without breaking the bank or damaging your nails with constant changes.
Seasonal Coordination Success: Maria plans her designs around her wardrobe seasons. In spring, she chooses mint-to-white gradients that complement her pastel blazers. Summer brings coral-to-peach designs that photograph beautifully during vacation. Fall calls for deep purple-to-burgundy that matches her jewel-toned sweaters, while winter features ice blue-to-silver for holiday parties. This strategic approach keeps her nails coordinated year-round.
How Bridesmaid for Hire Can Perfect Your Wedding Day Nails
Planning wedding day beauty details, including coordinating ombre designs for your entire bridal party, can quickly become overwhelming when you’re managing countless other elements. Professional wedding support services can handle these logistics while ensuring flawless execution.
Coordinating nail appointments for your entire bridal party while ensuring everyone’s designs complement your wedding color scheme requires careful planning and scheduling expertise. A professional bridesmaid service can handle these logistics, ensuring appointments align with your timeline and everyone arrives with perfectly executed nails.
Use our AI Wedding Planner to schedule bridal nail prep
Choosing the right design for wedding photos requires understanding how different finishes and colors photograph under various lighting conditions. Professional guidance helps you select designs that will look stunning in both natural outdoor lighting and indoor reception venues.
Coordinate your wedding ombre nails with our AI Wedding Planner
Ready to ensure your wedding day nails are absolutely perfect? Contact Bridesmaid for Hire to discuss how our professional wedding support services can handle your beauty coordination, leaving you free to focus on what truly matters – celebrating your love story with confidence and joy.
Let our AI Wedding Planner handle your nail coordination
Professional Application vs. DIY Success Rates
Understanding realistic expectations for at-home application versus professional results helps you make informed decisions about which designs to attempt yourself and when to invest in salon services.
Beginner Success Indicators
You’re ready for nude-to-clear and simple two-color gradients if you can apply base coats evenly and have patience for multiple thin layers. These designs forgive minor imperfections and blend naturally.
Intermediate Skill Markers
Pink-to-white gradients and French twists become achievable once you’ve mastered sponge blending techniques and can create smooth color transitions without harsh lines.
Advanced Technique Requirements
Chrome finishes, holographic effects, and 3D elements demand steady hands, specialized tools, and understanding of how different materials interact during application and curing processes.
Cost-Benefit Analysis:
- Budget-friendly DIY options ($15-30): Simple gradients using drugstore polishes with 1-2 week wear time
- Mid-range professional services ($50-85): Classic and seasonal designs with quality products and 2-3 week longevity
- Luxury specialty applications ($100-200+): Complex artistic designs with premium materials and extended appointment times
Compare DIY vs salon options with our AI Wedding Planner
Final Thoughts
Look, perfect ombre acrylic nails aren’t about following every trend or having salon-level skills. They’re about finding what makes you feel confident and fits your actual life.
Start with something simple that you can realistically maintain. Build your skills gradually. And remember – even nail artists had to practice. That first pink-to-white gradient might not be Instagram-worthy, but if it makes you happy when you look down at your hands, you’ve succeeded.
Don’t let perfect be the enemy of good enough. Sometimes a slightly imperfect DIY design you love is better than expensive professional nails that stress you out about chipping.
The world of ombre nail art offers endless possibilities for self-expression, from subtle workplace-appropriate gradients to bold artistic statements. Your perfect design exists somewhere within these 25 options – it’s simply a matter of matching your choice to your current life circumstances and aesthetic preferences.
Most importantly, have fun with it. They’re just nails – they grow out, polish comes off, and you get to try something new in a few weeks. Whether you choose a simple nude-to-clear gradient for everyday elegance or splurge on a complex 3D textured design for a special occasion, the key is selecting something that makes you feel authentically yourself.
Don’t be afraid to start simple and work your way up to more complex designs as your skills develop. Even the most experienced nail artists started with basic two-color gradients before mastering advanced techniques such as chrome applications and multi-dimensional effects.
Remember that nail art should enhance your confidence rather than create stress about maintenance or appropriateness. Success comes from realistic self-assessment and selecting designs that enhance rather than complicate your daily routine.
Choose the right nail design stress-free with our AI Wedding Planner


1-800-BRIDESMAID
The Newlywed
Card Game
something extra to love
Read the weekly newsletter from Bridesmaid for Hire, 1-800-Bridesmaid, to hear about real stories, from strangers, who need advice on love, life, friendship, and so much more.
Looking for the perfect wedding gift for someone you adore? Grab The Newlywed Card Game. It's a fun and interactive game they can play on their honeymoon or future date nights.

