


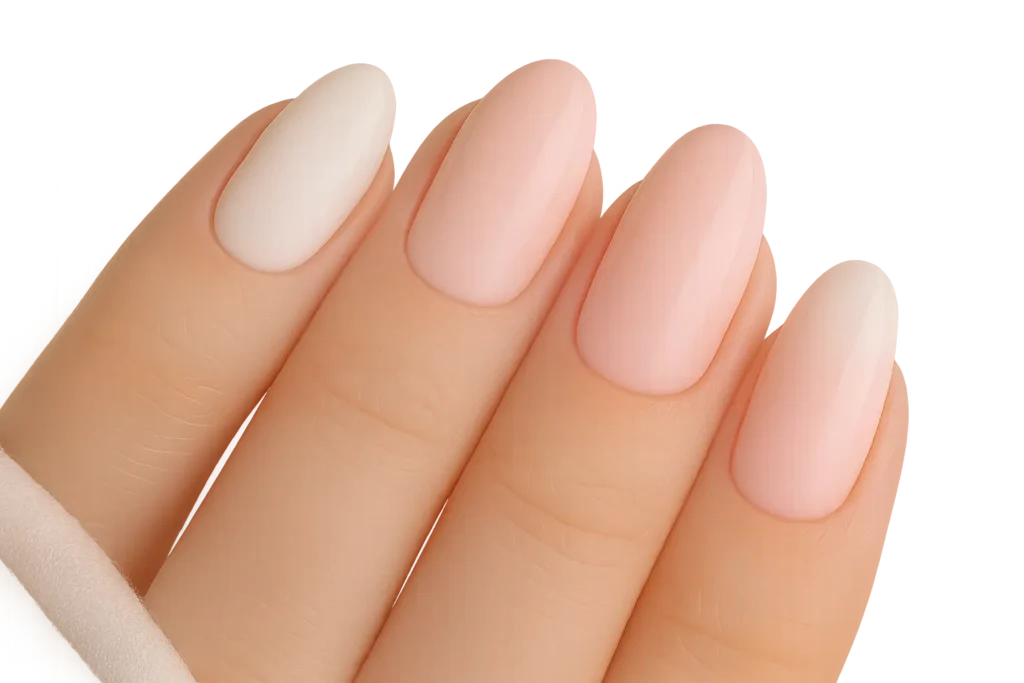
Ice cream nails have become the hottest manicure trend, with celebrity nail artist Harriet Westmoreland creating this dreamy look for A-listers like Zendaya and Rosie Huntington-Whiteley. According to Vogue UK, this trend transforms the classic French manicure into something that resembles “whipped gelato-like softness” by blending white tips into creamy bases.
I’ll never forget the first time I tried this look – I was skeptical about the whole “melting ice cream” effect until I saw how the glossy finish caught the light during my friend’s beach wedding. Now I’m completely obsessed with this ice cream manicure trend that’s taking over social media feeds everywhere. The way these designs capture that dreamy, soft-serve aesthetic while still being wearable for everyday life? Pure genius.
Planning your own special event? Match your dream nails with a stress-free planning experience using our AI Wedding Planner.
Quick Resources:
-
Plan Your Dream Wedding Effortlessly: AI Wedding Planner
-
Explore All Our Wedding Tools: All Wedding Tools
TL;DR
-
Ice cream nails blend classic French techniques with soft, creamy gradients that look like melting ice cream
-
25 unique designs span six categories from simple cone art to complex 3D creations
-
Skill levels range from total beginner to “call a professional immediately”
-
Budget reality check: DIY starts at $8, complex 3D can hit $180+
-
Maintenance varies wildly – simple designs last 10-14 days, 3D elements barely make it a week
-
Know your occasion – pastels work for weddings, bold 3D suits parties
The beauty of this trend? You can go subtle with pastel gradients or bold with rainbow drip effects – totally your call.
What to Consider When Choosing Your Perfect Look
Before you fall down the ice cream nail rabbit hole (trust me, it’s easy to do), let’s talk about what actually matters for your lifestyle. Your skill level, daily activities, color preferences, nail shape, and how much time you want to spend on maintenance all play a role.
Keep your entire celebration plan organized — from beauty prep to big-day details — with our AI Wedding Planner.
Here’s the truth: your skill level matters way more than what looks cool on Instagram. Beginners should start with simple gradients or solid colors. If you’re feeling more adventurous, try waffle cone textures and marble effects. Leave the advanced stuff for when you’ve got some practice under your belt.
For those planning special celebrations, understanding wedding planning deals can help coordinate your nails with other beauty services for your big day.
Save time and stress by managing beauty appointments and timelines in one place with our AI Wedding Planner.
|
Skill Level |
What You Can Handle |
Time You’ll Spend |
Success Rate |
|---|---|---|---|
|
Beginner |
Color blocking, simple gradients, basic dots |
30-45 minutes |
85% |
|
Intermediate |
Marble effects, waffle textures, drip art |
60-90 minutes |
70% |
|
Advanced |
3D elements, chrome powder, detailed artwork |
2-3 hours |
50% |
Think about your daily routine too. If you’re constantly typing, gardening, or doing hands-on work, those elaborate 3D sprinkles are going to be more frustrating than fabulous. Office job? Subtle pastels might be more your speed than bold rainbow explosions.
Budget reality check time. Professional work ranges from $40 for simple designs to $180+ for complex 3D creations. DIY requires upfront investment but saves money long-term.
Sarah, a busy marketing exec, went with simple pastel tones for her sister’s wedding. Took 40 minutes at home, cost $15 in supplies, and looked perfect through the entire weekend without any touch-ups.
Your nail shape matters more than you think. Almond and coffin shapes show off gradients beautifully, while square nails work better for geometric designs. Short nails limit some 3D options but are perfect for simple cone patterns.
Classic Cone Vibes
These five timeless designs capture that nostalgic ice cream cone feeling with waffle textures, creamy swirls, and classic flavors. Perfect for beginners to intermediate nail artists who want something recognizable and totally wearable.
1. Traditional Waffle Cone with Vanilla Swirl
This look combines golden brown waffle texturing with creamy white swirls for that authentic ice cream cone vibe. The crosshatch waffle pattern takes steady hands, but the results are so worth it for your Instagram feed.
Start with a nude or clear base. The waffle cone effect works best on accent nails – usually your ring fingers. Use golden brown polish with a small brush to create crosshatch patterns. For the vanilla swirl, grab creamy white polish with a hint of shimmer and apply in curved motions like you’re dispensing soft-serve.
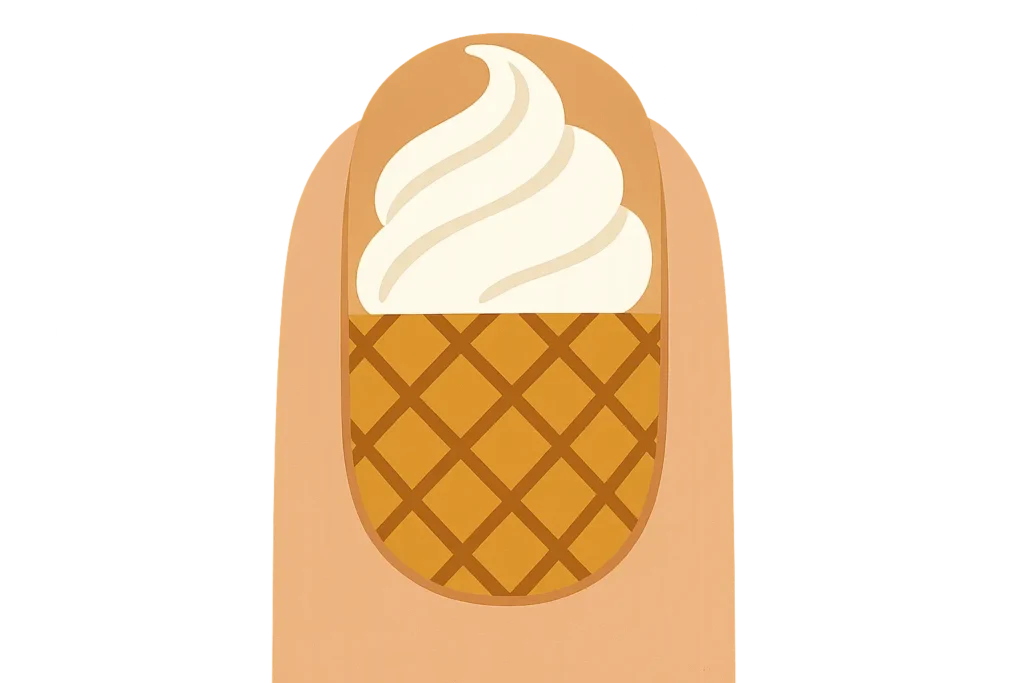
The waffle grid takes patience – use a thin nail art brush for intersecting diagonal lines. Let each layer dry completely or you’ll end up with a smudgy mess. Finish with glossy top coat to get that creamy ice cream shine.
2. Strawberry Ice Cream in Sugar Cone
Perfect for beginners, this uses soft pink gradients to create strawberry ice cream paired with light tan sugar cone texturing. Way easier than it looks but still impressive enough for compliments.
Create a soft pink gradient starting light at the cuticle and getting deeper toward the tip. This mimics how real strawberry ice cream looks. Add tiny white dots throughout the pink areas for texture.
Sugar cone detailing is more subtle than waffle cones – use light tan polish with gentle crosshatch marks instead of deep grids. The whole effect should feel softer and more delicate.
3. Chocolate Soft Serve Delight
Rich brown swirls create chocolate soft serve in this intermediate-level design. The swirled pattern takes some practice, but honestly, imperfections just add to the realistic texture.
Start with a warm beige base for the cone. Using different shades of brown polish, create swirled patterns like soft serve coming out of a machine. Layer different brown tones for depth.
The key to realistic soft serve swirls? Think about the motion – use curved, overlapping strokes, not perfect spirals. Golden waffle details on the ring finger provide contrast and complete the look.
4. Neapolitan Triple Scoop
This recreates the classic three-flavor combo with clean horizontal stripes in pink, white, and brown. The geometric approach makes it beginner-friendly while being totally recognizable.
Create three horizontal sections on each nail using pink (strawberry), white (vanilla), and brown (chocolate). Clean lines between flavors are key – use tape or nail guides for precision. Add tan waffle pattern at the nail base for the cone.
Consider a matte finish to reduce the glossy look and create more authentic ice cream texture. The contrast between matte ice cream and glossy cone details adds visual interest.
5. Mint Chip Ice Cream Cone
Pale mint green base with scattered dark green “chip” details creates this refreshing flavor interpretation. The random dot placement is super forgiving for beginners, and the color combo feels unique.
Start with pale mint green base coat. Use a dotting tool or small brush to add dark green “chip” spots randomly throughout. The irregular placement mimics real chocolate chips in ice cream.
Brown waffle texture on the thumb provides the cone element without overwhelming the design. Subtle glitter in the mint areas creates an icy effect that enhances the frozen treat vibe.
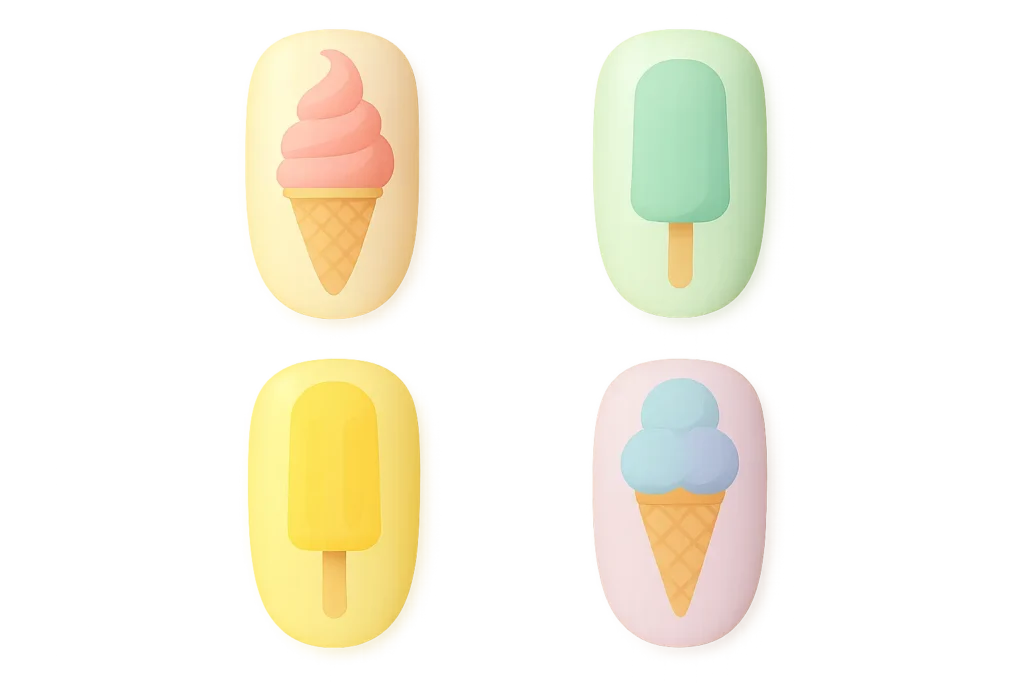
Popsicle & Ice Pop Magic
These four designs draw inspiration from frozen treats on sticks, featuring bold colors, clean geometric divisions, and serious summer vibes. The techniques range from “call a professional” gradient work to simple color blocking that anyone can handle.
6. Rainbow Push-Pop Gradient
Fair warning: this rainbow gradient is no joke. It takes practice, but when you nail it (pun intended), it’s absolutely stunning for festivals and pride events.
Start with a white base to make colors pop. Create vertical rainbow gradients using red, orange, yellow, green, blue, and purple. The trick is blending each color seamlessly while keeping distinct zones.
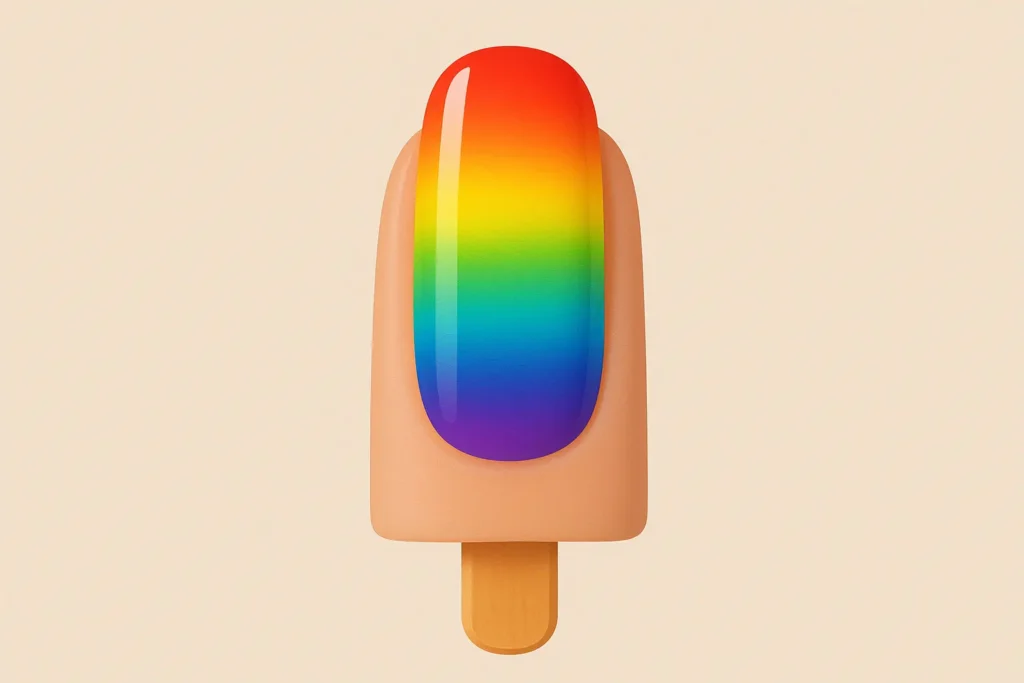
Add thin horizontal lines with a nail art brush to mimic push-pop segments. Keep these subtle – just enough to suggest the classic structure without overwhelming the rainbow.
7. Creamsicle Orange Dreams
This intermediate design combines orange and white in a marbled effect that captures creamy, swirled creamsicle vibes. More forgiving than precise gradients since the marbling process is naturally imperfect.
Create an orange to white gradient as your base, then marble them together. Drop white polish into wet orange and use a toothpick to create swirls.
The warm orange and cream combo hits all the nostalgic summer feels. The slightly imperfect marbled effect actually looks more authentic than perfect blending.
8. Fudge Bar Elegance
Deep chocolate brown with darker brown “stick” details at the base creates sophisticated fudge bar nails. Simple yet elegant for those who prefer understated nail art with subtle frozen treat references.
Apply deep chocolate brown as your base. Add darker brown “stick” details at the cuticle area. The monochromatic approach keeps it sophisticated while maintaining the theme.
Try adding subtle texture to mimic fudge – use matte top coat or gentle stippling with a makeup sponge while the polish is still tacky.
9. Fruit Bar Medley
Each nail gets a different fruit color – strawberry red, orange, lime green, grape purple – with wooden stick details at the cuticle. Playful celebration of fruit-flavored frozen treats that’s simple enough for beginners.
Assign different fruit colors: red for strawberry, orange for citrus, green for lime, purple for grape. Add subtle fruit texture using slightly darker shades applied with stippling technique.
Light brown or tan at the cuticle completes the popsicle stick illusion. Keep it as a thin line across the base of each nail.
Sundae & Dessert Dreams
These five elaborate designs transform your nails into miniature ice cream sundaes complete with toppings, drips, and layered effects. Complexity ranges from simple splatter techniques to advanced drip art – perfect for special occasions and dessert lovers.
When planning special events that call for elaborate nail designs, consider coordinating with bridal shower themes to create cohesive celebration aesthetics.
Coordinate every bridal detail seamlessly — from décor to beauty — with help from our AI Wedding Planner.
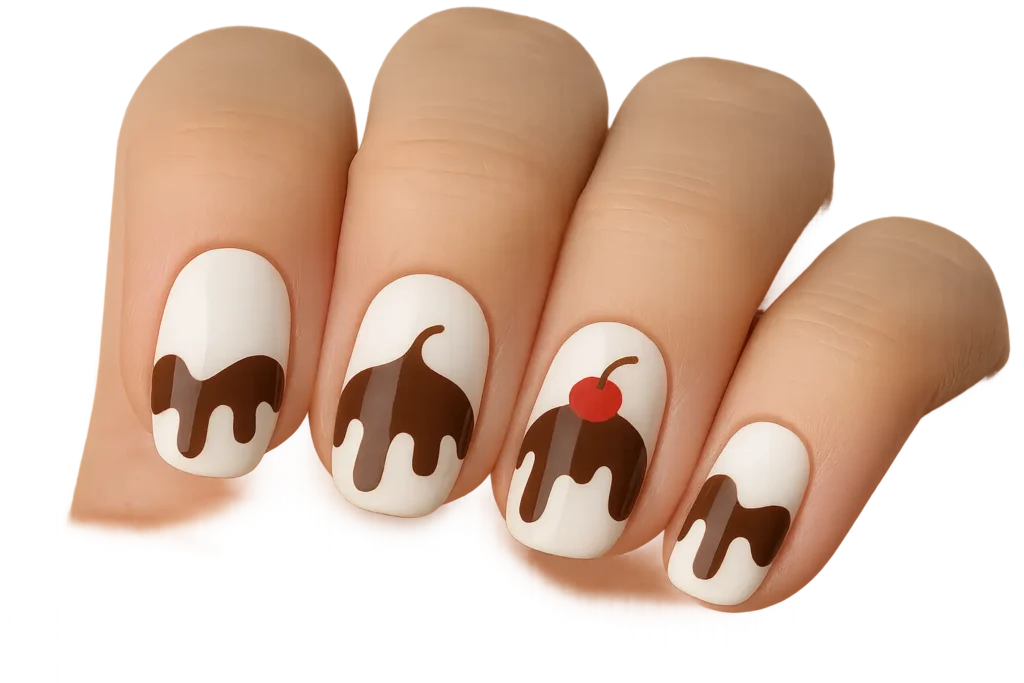
10. Hot Fudge Sundae Supreme
This advanced design features vanilla white base with realistic brown fudge drips cascading from the cuticle, topped with red cherry dots and rainbow sprinkles. The drip technique requires precision but creates stunning results for special events.
Start with vanilla white base, then create brown “fudge” drips using a small brush loaded with chocolate brown polish. Think of how real fudge drips – thick at the top, getting thinner as it falls. Practice on paper first (seriously, do this).
Add a single red cherry dot near the cuticle and scatter tiny rainbow sprinkle details with a dotting tool. Glossy finish is crucial – it mimics wet fudge sauce. Optional 3D cherry elements add extra dimension.
11. Banana Split Bonanza
Yellow banana base gets divided into chocolate, strawberry, and vanilla sections with chocolate sauce drips. This intermediate design captures the classic banana split while staying wearable for summer events.
Begin with yellow banana base, then section off areas for different ice cream flavors. Create chocolate, strawberry (pink), and vanilla (white) sections with clean divisions. Brown “chocolate sauce” drips add movement and authenticity.
Tiny colorful sprinkles scattered throughout complete the banana split effect. Balance all elements without creating visual chaos – each component should be distinct but harmonious.
12. Cookies & Cream Dream
White base with irregular black cookie crumb splatters celebrates the popular flavor. The imperfect splatter technique is super forgiving and actually enhances the realistic cookie appearance.
Apply white base, then use a fan brush or toothbrush to splatter black polish in irregular patterns. The random placement mimics real cookie crumbs mixed into vanilla ice cream. Don’t aim for perfection – messier looks more authentic.
Pro tip from my friend Jessica: grab an old toothbrush for the spattering. Hold it 6 inches from your nails and gently flick the bristles with your finger for natural-looking cookie pieces.
Mix matte and glossy finishes for texture contrast. Apply matte top coat to some areas while leaving others glossy for depth and visual interest.
13. Caramel Apple Sundae
Green apple base receives golden caramel drip effects with brown swirl details and optional crushed “nut” texture on accent nails. This fall-inspired design bridges seasonal transitions while maintaining the frozen treat theme.
Start with crisp green apple base, then add golden caramel drips using the same technique as hot fudge but with amber-toned polish. The caramel should look thick and glossy, flowing naturally from cuticle toward tip.
Brown caramel swirl details add depth and movement. Create these with a thin brush in curved motions that complement the drip patterns. Accent nails can feature crushed “nut” texture using stippling with brown and tan polishes.
14. Berry Parfait Layers
Horizontal layered effects alternate between berry colors (pink strawberry, purple blueberry) and white cream sections. This intermediate design requires steady hands for clean lines but creates beautiful results perfect for brunch events and spring celebrations.
Create distinct horizontal layers alternating between berry colors and white cream sections. Use tape or nail guides for clean divisions. Pink represents strawberry, purple represents blueberry, white represents cream or yogurt layers.
The layered effect should look neat and organized, like parfaits assembled in clear glasses. Each layer should be roughly equal in height for the most visually pleasing result.
Summer Ice Cream Truck Nostalgia
These four nostalgic designs capture the excitement and whimsy of ice cream truck treats with bold colors, patriotic themes, and childhood favorites. Perfect for summer festivals, holiday celebrations, and anyone wanting to embrace playful summer vibes.
15. Ice Cream Truck Nostalgia
Sky blue base with white truck silhouettes on accent nails, decorated with colorful ice cream icons and musical note details. This advanced design requires detailed artwork skills but creates impressive results for themed parties and nostalgic celebrations.
Begin with sky blue base across all nails for summer skies. The accent nail features a white ice cream truck silhouette created with a small brush or nail art pen. Add colorful ice cream icons around the truck – tiny popsicles, cones, and sundaes.
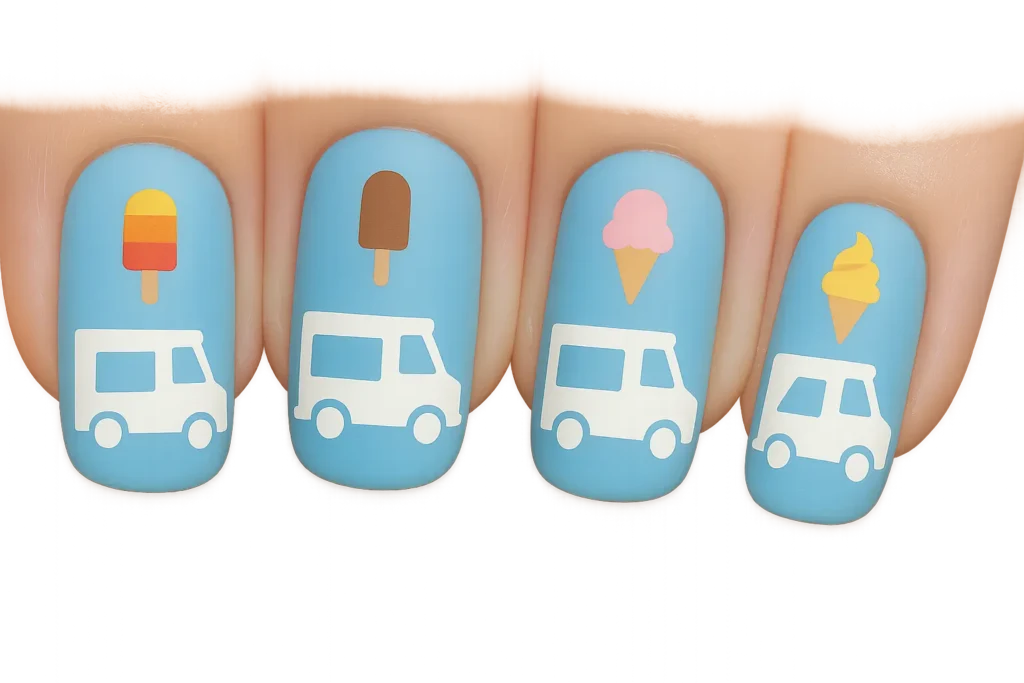
Small black musical notes scattered throughout reference those distinctive ice cream truck melodies. This design works best when professionally applied due to intricate details required for recognizable truck shapes and tiny icons.
16. Bomb Pop Patriotic
Clean geometric divisions create red, white, and blue sections that perfectly replicate the classic patriotic popsicle. This intermediate design requires precise lines but offers bold, recognizable results perfect for summer holidays.
Create sharp color divisions with red at the tip, white in the middle, blue at the base. Use tape or nail guides for clean, straight lines between colors. The geometric approach should be bold and graphic rather than blended or soft.
This design shines during patriotic holidays – July 4th, Memorial Day, and other American celebrations. The solid colors are durable and long-lasting, making them practical for extended holiday weekends.
17. Rocket Pop Retro
Sharp red, white, and blue color divisions with no blending create the classic rocket pop appearance. This beginner-friendly design focuses on clean lines and bold color blocking rather than complex techniques.
Apply colors in distinct sections – red tip, white middle, blue base – with sharp divisions between each color. The key is maintaining clean lines without any color bleeding or blending. Each section should appear solid and opaque.
The bold, graphic appearance makes this perfect for retro-themed events and summer celebrations. The simplicity allows for easy touch-ups and maintenance throughout wear.
18. Chipwich Cookie Sandwich
Light brown cookie base with white “ice cream” center stripe and dark brown chocolate chip dots creates this beloved ice cream sandwich interpretation. The matte finish enhances the cookie texture while remaining simple enough for intermediate nail artists.
Start with light brown cookie-colored base, then add a white center stripe to represent the ice cream filling. Dark brown chocolate chip dots scattered throughout the brown areas complete the cookie sandwich illusion.
The slightly matte finish is crucial for authentic cookie texture. Apply matte top coat to the brown areas while keeping the white “ice cream” section glossy for contrast and realism.
Trendy Modern Takes
These four contemporary designs elevate traditional ice cream nails with modern techniques including holographic effects, chrome finishes, and trendy color palettes. Perfect for fashion-forward individuals and social media content creation.
19. Pastel Ice Cream Parlor
Different pastel colors on each nail – lavender, mint, peach, baby pink, and lemon – create a soft, dreamy aesthetic perfect for spring weddings and romantic occasions. This beginner-friendly design focuses on color selection rather than complex techniques.
Apply a different pastel shade to each nail, creating a cohesive yet varied look that mimics an ice cream parlor’s flavor selection. Choose colors that complement each other – lavender, mint green, peach, baby pink, and soft lemon yellow work beautifully together.
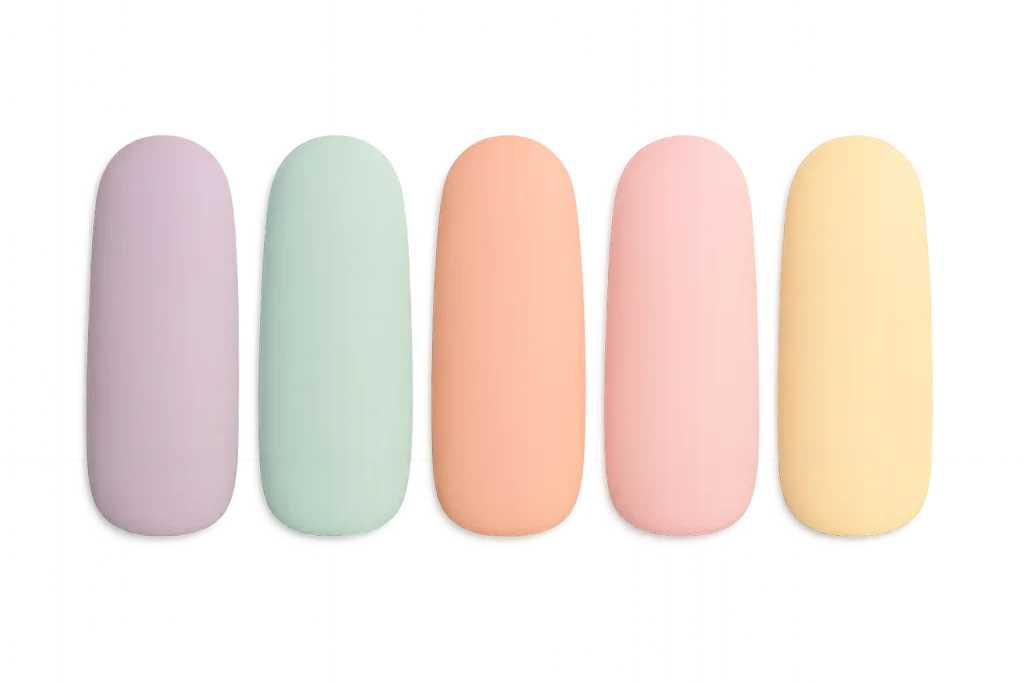
The soft, dreamy aesthetic pairs perfectly with spring and summer weddings, baby showers, and romantic date nights. The simplicity makes it accessible for beginners while remaining elegant and sophisticated.
These pastel nails complement beautifully with spring wedding colors for coordinated bridal party looks.
Make your bridal beauty vision come to life with the AI Wedding Planner — your personalized wedding coordination tool.
20. Holographic Ice Cream Magic
Holographic powder creates color-changing, iridescent ice cream swirls that shift and shimmer in different lighting. This intermediate technique requires special products but delivers stunning, Instagram-worthy results perfect for parties and festivals.
Apply a clear or white base, then use holographic powder to create ice cream swirl patterns. The powder should be applied over tacky gel polish and sealed with top coat. The resulting effect changes color depending on viewing angle and lighting conditions.
This futuristic approach to ice cream nails creates maximum impact for social media photos and party settings. The iridescent finish catches light beautifully and creates mesmerizing color shifts.
21. Matte Ice Cream Aesthetic
Various ice cream colors finished with completely matte top coat create a modern, sophisticated interpretation of the trend. This simple technique transforms traditional glossy designs into contemporary art suitable for professional settings.
Choose ice cream-inspired colors – dusty pink, sage green, lavender, cream – and apply matte top coat for a completely different aesthetic. The matte finish creates a modern, editorial look that feels sophisticated rather than playful.
This approach works well for professional environments where subtle nail art is preferred. The ice cream colors remain recognizable while the matte finish keeps them understated and chic.
22. Chrome Ice Cream Luxury
Chrome powder in rose gold, silver, and gold creates high-end, editorial nails with mirror-finish effects. This advanced technique requires special products and skills but delivers luxury results perfect for special occasions.
Apply chrome powder over black or dark base colors to achieve maximum reflectivity. Rose gold, silver, and gold chrome create luxurious ice cream interpretations that feel high-end and editorial rather than playful.
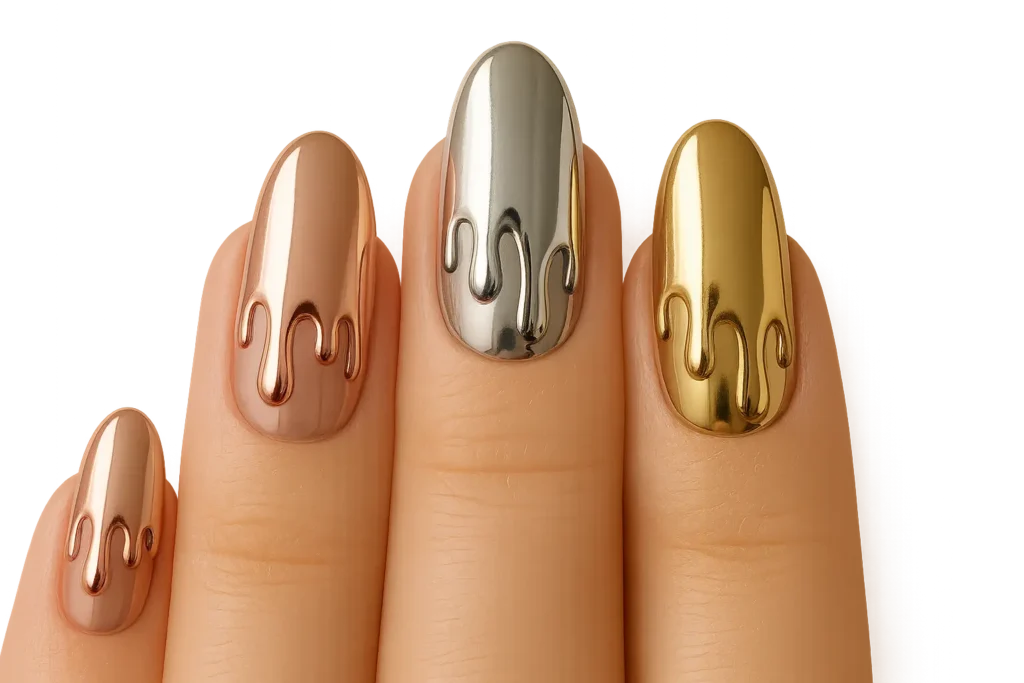
The mirror finish creates dramatic impact suitable for evening events, photoshoots, and special occasions where maximum glamour is desired. Professional application is recommended for best results.
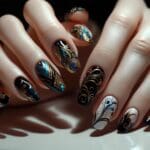
3D & Textured Masterpieces
These three advanced designs incorporate dimensional elements and specialized textures that create realistic ice cream effects. Requiring expert-level skills and professional application, these designs make bold statements for special events and artistic expression.
23. 3D Sprinkle Explosion
Real tiny 3D sprinkles embedded in gel polish create authentic sprinkle-covered nails. This expert-level technique requires specialized products and thick top coats but delivers maximum visual impact for celebrations and parties.
Embed actual tiny 3D sprinkles into wet gel polish, then seal with multiple layers of thick top coat for smoothness. The sprinkles should be completely encased to prevent catching on clothing or hair.
This design creates maximum celebration vibes perfect for birthdays, parties, and festive occasions. However, the 3D elements make the nails vulnerable to damage and significantly reduce longevity.
24. Whipped Cream Texture Nails
Specialized textured gel creates realistic whipped cream effects using dotting tools and swirl patterns. This expert technique requires advanced skills and specialized products but produces incredibly realistic results perfect for editorial work.
Use textured gel polish and dotting tools to create raised swirl patterns that mimic real whipped cream. The technique requires building up layers gradually and working quickly before the gel cures.
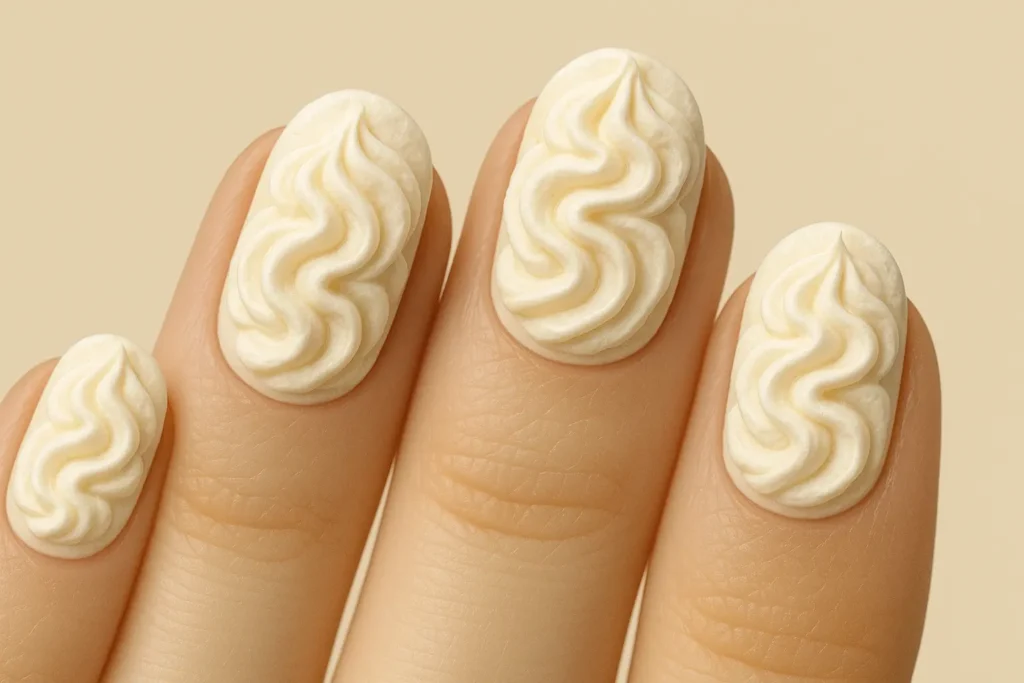
This realistic effect works best for editorial shoots, special events, and artistic nail competitions. The texture shows wear quickly, making it impractical for everyday wear.
25. Ice Cream Sandwich 3D Art
Raised white “ice cream” center between brown cookie-textured areas creates dimensional ice cream sandwich nails. This advanced technique uses acrylic or gel buildup to create authentic sandwich proportions and textures.
Build up the white “ice cream” center using acrylic or thick gel, creating actual dimension between the brown cookie areas. The raised center should be smooth while the cookie areas feature textured, matte finishes.
Cookie texture on the outer areas can be achieved through stippling techniques or specialized texture gels. The contrast between smooth ice cream and textured cookie areas enhances the realistic sandwich effect.
Real Talk: How These Actually Wear
Let’s be honest about what these designs are actually like to live with. Understanding how different styles perform in terms of durability, maintenance, cost, and practicality helps you make smart decisions based on your lifestyle.
|
Design Category |
Average Cost |
Durability |
Maintenance Level |
Best For |
|---|---|---|---|---|
|
Simple Gradients |
$8-25 DIY |
10-14 days |
Low |
Daily wear, beginners |
|
Intermediate Art |
$30-60 |
7-10 days |
Medium |
Special events, weekends |
|
3D/Advanced |
$80-180+ |
5-7 days |
High |
Photoshoots, parties |
Simple designs offer the best longevity, lasting 10-14 days with minimal maintenance. These beginner-friendly options hide minor chips well and require basic touch-up skills.
Complex 3D designs create maximum visual impact but sacrifice durability. Expect 5-7 days maximum wear time due to vulnerable raised elements that catch on everything.
Budget considerations vary dramatically across design categories. DIY simple gradients cost $8-25 in supplies, while professional 3D applications can reach $180+ due to time investment and specialized materials required.
My friend Maria tested three different designs for her summer vacation: simple pastel gradients lasted her entire 10-day trip without chips, intermediate drip art needed touch-ups after 6 days, and 3D sprinkles started lifting after just 3 days of beach activities and swimming.
Professional application becomes necessary for advanced techniques involving chrome powders, detailed artwork, and 3D elements. These designs require specialized tools, products, and expertise that most home nail artists don’t possess.
|
Nail Shape |
Best Ice Cream Designs |
Why It Works |
Avoid |
|---|---|---|---|
|
Almond/Coffin |
Gradients, drip effects |
Elongated canvas showcases blending |
Heavy 3D elements |
|
Square |
Geometric patterns, color blocking |
Clean lines, structured look |
Curved swirl patterns |
|
Round/Oval |
Simple cones, pastels |
Balanced proportions |
Complex detailed art |
Why These Nails Are Perfect for Special Events
Ice cream nails perfectly complement special celebrations and events, offering sweet, photogenic details that enhance memorable moments. The right nail choice can boost confidence and create cohesive event aesthetics that photograph beautifully.
Planning the perfect celebration involves countless details, and nail choices significantly impact your overall confidence and photo-ready appearance. These designs offer versatile options suitable for various event types – from subtle pastels for elegant weddings to bold 3D designs for bachelorette parties.
Coordinating nail designs with your event theme creates cohesive aesthetics that photograph beautifully. Pastel ice cream parlor nails complement spring weddings perfectly, while patriotic bomb pop designs enhance July 4th celebrations.
When planning your special day, consider how bridal party gifts can coordinate with your ice cream nail theme for a cohesive celebration aesthetic.
Planning a wedding and want coordinated nails for your crew? This is exactly the kind of detail that makes photos pop. Professional event support ensures every detail contributes to your perfect day.
For comprehensive event coordination including beauty services, explore wedding day coordination services that ensure every detail is perfect.
Ready to add sweet details to your next celebration? Whether you’re planning a summer wedding with coordinated themes or organizing a bachelorette party with matching 3D sprinkle designs, professional event support ensures every detail contributes to your perfect day.
Ensure every beauty and event detail shines on your big day with our AI Wedding Planner.
Final Thoughts
Look, ice cream nails are having a moment, and honestly? I’m here for it. These designs represent more than just a trendy manicure – they capture the joy, nostalgia, and sweetness that make special moments memorable. From simple pastel gradients perfect for everyday wear to elaborate 3D creations designed for maximum celebration impact, these 25 designs offer something for every skill level, budget, and occasion.
The key to successful ice cream nails lies in honest assessment of your abilities, lifestyle, and maintenance commitment. Start easy, work your way up, and don’t stress if your first attempt looks more “abstract art” than “Instagram perfect.” That’s half the fun.
Your daily activities, professional requirements, and personal style preferences should guide design selection more than trending social media posts. Sometimes the sweetest choices are the ones that bring genuine joy to your everyday moments.
Remember that the most beautiful nail design is one that makes you feel confident and authentic. Whether you choose subtle creamsicle swirls for a professional setting or bold rainbow gradients for festival season, the right design should enhance your natural style rather than overwhelm it.
For those seeking professional guidance on coordinating beauty details for special occasions, wedding coaching services can help ensure your ice cream nail choice perfectly complements your overall celebration vision.


1-800-BRIDESMAID
The Newlywed
Card Game
something extra to love
Read the weekly newsletter from Bridesmaid for Hire, 1-800-Bridesmaid, to hear about real stories, from strangers, who need advice on love, life, friendship, and so much more.
Looking for the perfect wedding gift for someone you adore? Grab The Newlywed Card Game. It's a fun and interactive game they can play on their honeymoon or future date nights.

